 driving checks and adjustmentsPre-driving checks and adjustments Keys . 3-2 Integrated keyfob/remote control system . " width="960" height="677" />
driving checks and adjustmentsPre-driving checks and adjustments Keys . 3-2 Integrated keyfob/remote control system . " width="960" height="677" />
3Pre-driving checks and adjustmentsPre-driving checks and adjustments
Keys . 3-2
Integrated keyfob/remote control system . 3-3
Using the remote keyless entry system . 3-3
Locking the doors . 3-3
Unlocking the doors – convenience mode . 3-4
Unlocking the doors – anti-hijack mode . 3-4
Switching from convenience mode to
anti-hijack mode. 3-4
Keyfob operation failure . 3-4
Intelligent Key system (where fitted) . 3-5
Locking/unlocking . 3-5
Starting the engine with the Intelligent Key . 3-6
Door locks . 3-6
Super Lock System (Right-hand drive models) . 3-6
Vehicle dead battery – left-hand side door
handle . 3-7
Locking with power door lock switch . 3-7Child safety rear door lock . 3-8
Back door lock . 3-8
Security system . 3-9
NISSAN Anti-Theft System (NATS). 3-9
Bonnet release . 3-10
Fuel filler lid . 3-11
Fuel filler lid opener lever . 3-11
Fuel filler cap . 3-11
Handbrake lever . 3-11
Tilting steering wheel . 3-12
Mirrors. 3-12
Inside rear-view mirror . 3-12
Outside rear-view mirrors. 3-12
Vanity mirror . 3-13
Rear parcel shelf. 3-14
Rear parcel shelf removal. 3-14
Rear parcel shelf installation. 3-14
 opener lever j1 . To lock, close the fuel filler lid securely. FUEL FILLER CAP The fuel filler cap is a " width="960" height="677" />
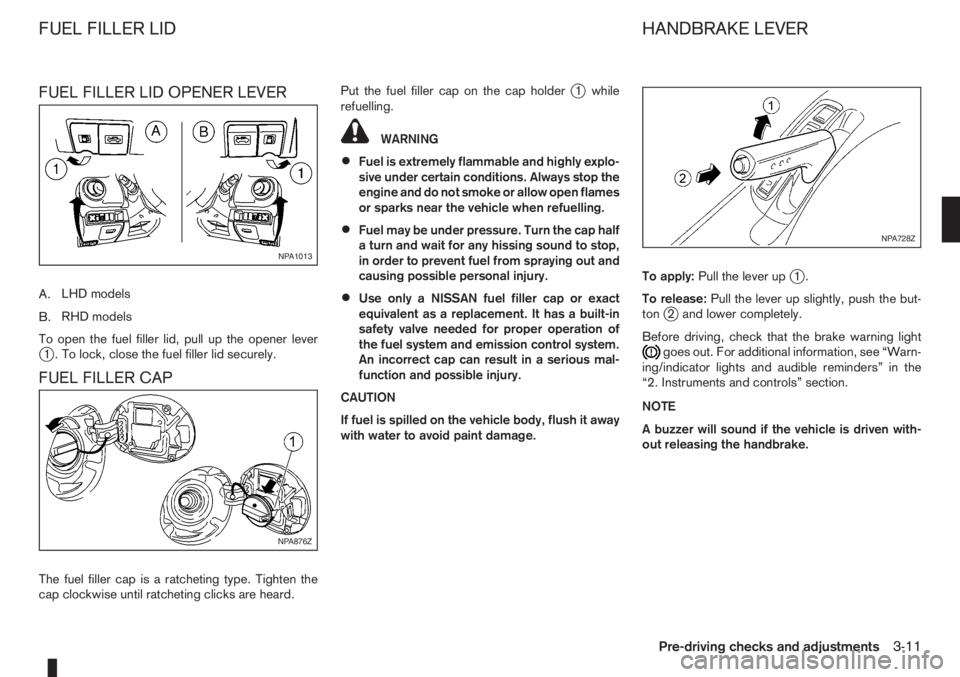
FUEL FILLER LID OPENER LEVER
A.LHD models
B.RHD models
To open the fuel filler lid, pull up the opener lever
j1 . To lock, close the fuel filler lid securely.
FUEL FILLER CAP
The fuel filler cap is a ratcheting type. Tighten the
cap clockwise until ratcheting clicks are heard.Put the fuel filler cap on the cap holder
j1 while
refuelling.
WARNING
•Fuel is extremely flammable and highly explo-
sive under certain conditions. Always stop the
engine and do not smoke or allow open flames
or sparks near the vehicle when refuelling.
•Fuel may be under pressure. Turn the cap half
a turn and wait for any hissing sound to stop,
in order to prevent fuel from spraying out and
causing possible personal injury.
•Use only a NISSAN fuel filler cap or exact
equivalent as a replacement. It has a built-in
safety valve needed for proper operation of
the fuel system and emission control system.
An incorrect cap can result in a serious mal-
function and possible injury.
CAUTION
If fuel is spilled on the vehicle body, flush it away
with water to avoid paint damage.To apply:Pull the lever up
j1.
To release:Pull the lever up slightly, push the but-
ton
j2 and lower completely.
Before driving, check that the brake warning light
goes out. For additional information, see “Warn-
ing/indicator lights and audible reminders” in the
“2. Instruments and controls” section.
NOTE
A buzzer will sound if the vehicle is driven with-
out releasing the handbrake.
NPA1013
NPA876Z
NPA728Z
FUEL FILLER LID HANDBRAKE LEVER
Pre-driving checks and adjustments3-11

WARNING
•To avoid the danger of being scalded, never
change the coolant when the engine is hot.
•Avoid direct skin contact with used coolant. If
skin contact is made, wash thoroughly with
soap or hand cleaner and plenty of water as
soon as possible.
•Keep coolant out of reach of children and
pets.
NISSAN GREEN PROGRAM
Engine coolant must be disposed of properly.
Check your local regulations.
CR14DE or HR16DE engine
1. Set the heater or air conditioner temperature
control to the maximum “HOT” position.
2. Open the bonnet. For details, see “Bonnet
release” in the “3. Pre-driving checks and
adjustments” section.
3. Open the radiator cap
j1 (where fitted) or en-
gine coolant reservoir cap to help to drain the
coolant.
4. Slacken off the radiator lower hose clip
j2and
remove the lower hosej3 to drain the coolant.
5. Flush the cooling system by running clean water
through the radiator filler opening (where fitted)
or engine coolant reservoir.
6. Install the radiator lower hose on the radiator
securely.7. Fill the radiator through the filler opening (where
applicable) slowly with coolant and fill the cool-
ant reservoir up to the MAX level. See “Capaci-
ties and recommended fuel/lubricants” in the
“9. Technical information” section for cooling
system capacity.
8. Install the radiator cap (where fitted) and the en-
gine coolant reservoir cap.
9. Start the engine, and warm it up until the radiator
fan operates. Then rev the engine two or three
times under no load. Observe the coolant tem-
perature warning light for signs of overheating.
10. Stop the engine. After it has completely cooled
down, refill the radiator up to the filler opening
(where fitted). If the coolant level lowered, fill
the engine coolant reservoir up to the MAX level.
11. Check radiator lower hose for any signs of leak-
age.
12. Close the bonnet.
K9K engine
1. Set the heater or air conditioner temperature
control to the maximum “HOT” position.
2. Open the bonnet. For details, see “Bonnet
release” in the “3. Pre-driving checks and
adjustments” section.
3. Disconnect the radiator lower hose
j1 and open
the drain plugj2 on the engine block.
4. Open the engine coolant reservoir cap to help to
drain the coolant.
5. Flush the cooling system by running fresh water
through the radiator.
6. Install the radiator lower hose to the radiator and
securely tighten the engine block drain plug.
7. Fill the reservoir up to the MAX level with cool-
ant. See “Capacities and recommended
fuel/lubricants” in the “9. Technical information”
section for cooling system capacity.
8. Install the engine coolant reservoir cap.
9. Start the engine and run the engine at about
2,000 rpm for 1 minute.
10. Stop the engine and check coolant level, allow
to cool and refill up to the MAX level.
11. Warm up the engine at about 2,000 rpm until it
reaches the normal operational temperature
(fan cycles).
Check heater core (below instrument panel) for
gurgling, refill if necessary.
NDI671Z
K9K engine
Maintenance and do-it-yourself8-7
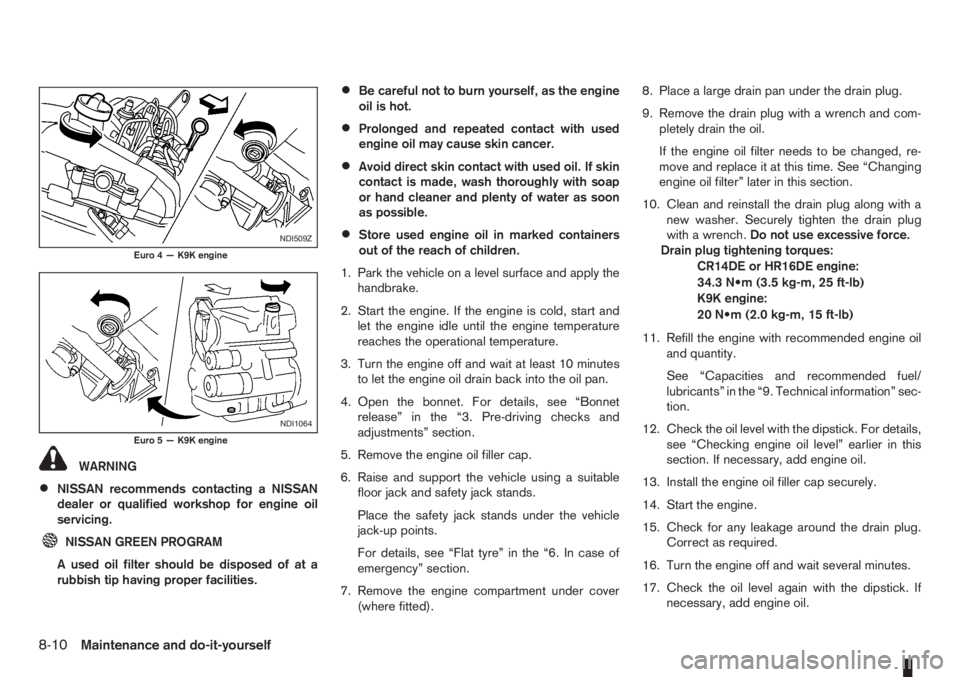
WARNING
•NISSAN recommends contacting a NISSAN
dealer or qualified workshop for engine oil
servicing.
NISSAN GREEN PROGRAM
A used oil filter should be disposed of at a
rubbish tip having proper facilities.
•Be careful not to burn yourself, as the engine
oil is hot.
•Prolonged and repeated contact with used
engine oil may cause skin cancer.
•Avoid direct skin contact with used oil. If skin
contact is made, wash thoroughly with soap
or hand cleaner and plenty of water as soon
as possible.
•Store used engine oil in marked containers
out of the reach of children.
1. Park the vehicle on a level surface and apply the
handbrake.
2. Start the engine. If the engine is cold, start and
let the engine idle until the engine temperature
reaches the operational temperature.
3. Turn the engine off and wait at least 10 minutes
to let the engine oil drain back into the oil pan.
4. Open the bonnet. For details, see “Bonnet
release” in the “3. Pre-driving checks and
adjustments” section.
5. Remove the engine oil filler cap.
6. Raise and support the vehicle using a suitable
floor jack and safety jack stands.
Place the safety jack stands under the vehicle
jack-up points.
For details, see “Flat tyre” in the “6. In case of
emergency” section.
7. Remove the engine compartment under cover
(where fitted).8. Place a large drain pan under the drain plug.
9. Remove the drain plug with a wrench and com-
pletely drain the oil.
If the engine oil filter needs to be changed, re-
move and replace it at this time. See “Changing
engine oil filter” later in this section.
10. Clean and reinstall the drain plug along with a
new washer. Securely tighten the drain plug
with a wrench.Do not use excessive force.
Drain plug tightening torques:
CR14DE or HR16DE engine:
34.3 N•m (3.5 kg-m, 25 ft-lb)
K9K engine:
20 N•m (2.0 kg-m, 15 ft-lb)
11. Refill the engine with recommended engine oil
and quantity.
See “Capacities and recommended fuel/
lubricants” in the “9. Technical information” sec-
tion.
12. Check the oil level with the dipstick. For details,
see “Checking engine oil level” earlier in this
section. If necessary, add engine oil.
13. Install the engine oil filler cap securely.
14. Start the engine.
15. Check for any leakage around the drain plug.
Correct as required.
16. Turn the engine off and wait several minutes.
17. Check the oil level again with the dipstick. If
necessary, add engine oil.NDI509Z
Euro 4 — K9K engine
NDI1064
Euro 5 — K9K engine
8-10Maintenance and do-it-yourself